Что такое режим отладки или “дебаг” и как его мне его включить на сайте WordPress?
Ответ
Режим отладки больше нужен для проверки изменений, сделанных в коде. Например, Вы что-то изменили или добавили в файл Вашей темы functions.php, а правки оказались с ошибкой. В итоге Вы увидите белый экран без каких-либо объяснений что случилось. Режим отладки или “дебаг” сообщит об ошибке и даже укажет в какой именно строке файла она содержится.
Все действия по включению/отключению режима отладки производятся в основном конфигурационном файле wp-config.php, который находится в корневом каталоге Вашего сайта
WordPress имеет широкие возможности вывода ошибок во время отладки кода. Наиболее грамотным и безопасным считается вывод ошибок не на экран, а запись в файл.
Во-первых, сначала режим нужно задействовать. За это отвечает следующая команда:
Отметим, что в таком случае все ошибки и предупреждения будут выводиться на экран. Следующие строки запретят визуальный показ ошибок, записывая все сообщения о них в специальный файл, который находится по адресу /wp-content/debug.log.
В итоге, чтобы включить “дебаг”-режим, необходимо в файл wp-config.php добавить следующие строки кода:
Нажмите, пожалуйста, на одну из кнопок, чтобы узнать понравилась статья или нет.
Это — незаконченная статья
Вы можете помочь проекту, дополнив её
Debug Mode в игре StH2 . На иллюстрации обозначены: 1 — координаты положения камеры (первая строка), координаты нахождения Соника (вторая строка) в шестнадцатеричной системе, 2 — количество спрайтов на экран в десятичной системе, 3 — Игрок в режиме размещения объектов
Debug Mode (рус. Режим отладки) — недокументированная возможность, частая спутница почти всех ранних игр франшизы Sonic the Hedgehog. Режим предназначался для тестирования зон в ходе разработки и поиска ошибок и неисправностей спрайтов, объектов или систем коллизий. Присутствует в финальных версиях игр StH , StH2 , StH3 / S&K и SCD , а также в Sonic Mania, уже, правда, как «пасхалка».
Классический Debug Mode Править
В этом разделе рассматривается версия режима отладки для Sonic the Hedgehog (16-бит), которая затем без особых изменений перекочевала во все последующие игры основной серии вплоть до Sonic & Knuckles.
Способы активации Править
- Sonic the Hedgehog (16-бит) — Во время появления титульного экрана необходимо нажать последовательность кнопок: C, C, ↑, ↓, ←, →, затем A + START. Для игры в японском регионе последовательность несколько другая: C, C, C, C, ↑, ↓, ↓, ↓, ←, →, затем A + START.
- Sonic CD — в меню Sound Test (активируется комбинацией ↓, ↓, ↓, ←, →, A) необходимо набрать следующую последовательность треков: FM40, PCM12, DA11. Если всё сделано верно, появится изображение-пасхалка: Тейлз рядом с гоночной машиной и надпись «See you next game» (рус. «Увидимся в следующей игре») (видимо, скрытый анонс Sonic Drift). После этого Debug Mode будет доступен. В европейском регионе и бета-прототипе 920 режим отладки активируется гораздо проще: во время демо-ролика необходимо нажать кнопку START со второго контроллера.
- Sonic the Hedgehog 2 (16-бит) — В меню Sound Test, расположенном в Level Select, нужно проиграть треки в порядке: 01, 09, 09, 02, 01, 01, 02, 04. Если всё сделано правильно, вы услышите звук подобранного кольца. После выбора зоны в Level Select, нужно удерживать A при загрузке уровня для активации режима отладки.
- Sonic the Hedgehog 3 — При появлении вступительного экрана «SEGA» надо нажать последовательность кнопок ↑, ↑, ↓, ↓, ↑, ↑, ↑, ↑, и если всё сделано правильно, проиграется звук подбора кольца. Сделать это нужно максимально быстро, вовремя поймав момент, иначе игра попросту не примет команды игрока, потому что из-за довольно странного кода загрузки управление с джойстика то включается, то выключается, и лишь на короткий момент (самое начало появление надписи «SEGA») управление включено полностью. Из-за этого активировать этот код очень тяжело. Гораздо проще воспользоваться кодом Pro Action Replay FFFFFA:0100. В StH3 режим отладки непосредственно интегрирован с Level Select.
- Sonic the Hedgehog 3 & Knuckles — войдя в Mushroom Hill Zone через Level Select, необходимо встать на тарзанку и нажать последовательность кнопок ←, ←, ←, →, →, →, ↑, ↑, ↑, и после этого выйти на титульный экран с помощью нажатия A во время паузы. Наконец, необходимо снова зайти в Level Select и войти на любой уровень при помощи комбинации A + START.
- Sonic the Hedgehog (2013) — войдя в Level Select через режим игры «Без Сохранений», нужно ввести в Sound Test код 01-09-09-01-00-06-02-03, после чего включить любой уровень. Чтобы войти в этот режим, игрок должен нажать в левый верхний угол экрана.
Читайте также: Что будет если не вычесать мертвых гнид
Управление Править
- Кнопка B активирует режим размещения объектов, в котором можно расставить спрайты из списка по всему уровню. Вместо Соника будет отображаться спрайт выбранного объекта. Повторное нажатие кнопки B позволяет выйти из режима размещения объектов
- Кнопка A переключает объекты из списка.
- По нажатию кнопки C выбранный объект размещается на уровне.
Во время паузы кнопки переназначаются:
- При нажатии кнопки A уровень закроется и игрок попадёт на титульный экран (В StH3 / S&K вместо титульного экрана игрок попадёт в меню Level Select).
- Кнопка B при удержанном START активирует медленный режим (примерно наполовину от стандартной скорости).
- Кнопка C позволяет включить покадровую анимацию.
Debug mode is a modified game state in Project Zomboid. In this mode, the player has access to multiple developer tools which can spawn items, enable various cheats, teleport the player to any destination, and more.
Contents
Enabling
To enable the debug mode, hold LShift while the game is booting, or for a more permanent option, add -debug to the game launch parameters prior to booting the game.
Debug scenario
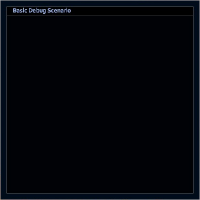
A list of debug scenarios can be found on the main menu, double-clicking will start the game in a predefined scenario. Custom scenarios can be made by editing «DebugScenario.lua» at «ProjectZomboidmedialuaclientDebugUIsScenarios», or creating a new scenario.
Debug menu
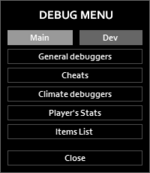
The debug menu is a user interface allowing the player to view/manipulate the game state.
When in a game, a grey bug icon on the left of the HUD will appear when in debug mode. Clicking this, will make it red and display the debug menu.
Debug menu icon. Debug menu open icon.
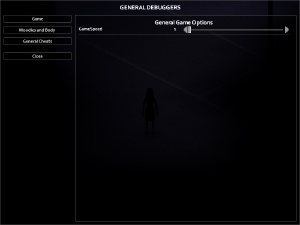
General debuggers
This option shows all general game options. Currently, the only option is «GameSpeed».
Читайте также: От чего зависит четкость фотографии
General Game Options OptionDescriptionVariablesGameSpeedAdjust the game speed by moving the slider. Clicking the left and right arrows will increase/decrease the game speed by 0.1 increment at a time, or 1.0 if holding the sprint key ( LShift by default). This value can range from 1 to 1000, with 0.1 increments.default=1fast-forward=5
fast-fast-forward=20
wait=40
Moodles and Body
Player Stats and Body OptionDescriptionVariablesHungerSlider that affects the hunger moodle, increases to 1 naturally.min=0
max=1ThirstSlider that affects the thirst moodle, increases to 1 naturally.min=0
max=1FatigueSlider that affects the tired moodle, increases to 1 naturally.min=0
max=1EnduranceSlider that affects the endurance moodle, increases to 1 naturally.min=0
max=1FitnessSlider that affects the fitness skill. This is a dynamic skill that will increase and decrease depending on the player’s actions in 0.2 increments (per level).min=-1
max=1DrunkennessSlider that affects the drunk moodle, decreases to 0 naturally. A full bottle of alcohol adds 0.41. A higher value will increase the fatigue moodle at a much higher rate.min=0
max=100AngerSlider that affects the angry moodle, decreases to 0 naturally.min=0
max=1FearSlider that affects an unknown naturally static value.min=0
max=1PainSlider that affects the pain moodle, decreases to 0 naturally. Cannot be adjusted manually min=0
max=100PanicSlider that affects the panic moodle, decreases to 0 naturally.min=0
max=100MoraleSlider that decreases to 0 naturally when stress is above 0.5. When stress is below 0.5, morale will instantly become 1.0.min=0
max=1StressSlider that affects the stress moodle, decreases to 0 naturally.min=0
max=1BoredomLevelSlider that affects the bored moodle, decreases to 0 naturally.min=0
max=100SanitySlider that can be adjusted when the BoredomLevel is above 50.min=0
max=1WetnessSlider that affects the wet moodle, decreases to 0 naturally.min=0
max=100TemperatureSlider that affects the player’s body temperature, affecting the hyperthermia and hypothermia moodles, decreases to 0 naturally.min=20
max=40ColdDamageStage (hypo 4)Slider that determines how much damage the player will take when the hypoermia moodle is at level 4.min=0
max=1OverallBodyHealthSlider that affects the player’s overall health.min=0
max=100CatchAColdStrengthSlider that affects the cold moodles, increaes to 100 naturally when above 1.0.min=0
max=100SicknessSlider that determines the sick moodle. Adjusts with InfectionLevel and FakeInfectionLevel Cannot be adjusted manually min=0
max=1InfectionLevelSlider that affects the player’s progress towards zombification, increasing rate of damage taken.min=0
max=100FakeInfectionLevelSlider that affects the player’s sickness, naturally occurs with the hypochondriac trait.min=0
max=100FoodSicknessLevelSlider that affects the player’s sickness, naturally occurs after eating bad food.min=0
max=100IsInfectedCheckbox that determines whether the player has the zombie infection.booleanIsFakeInfectedCheckbox that determines whether the player is should have zombie infection symptoms without being infected.booleanIsOnFireCheckbox that determines whether the player is on fire.booleanGhostCheckbox that determines whether the zombies can see the player, and zombies can be seen regardless of visibility.booleanGod ModeCheckbox that determines whether the player is in god mode. Gives the player invincibility, i.e. takes no damage, max hunger, thirst, etc.booleanЧитайте также: Клавиатура oklick 780l инструкция
General Cheats
OptionDescriptionVariablesBuild CheatCheckbox that determines whether all buildables in the metalwork and carpentry menus can be instantly built without the need of a skill or tool.booleanHealth Panel CheatCheckbox that determines whether the debug options inside the health panel are available.booleanMoveable CheatCheckbox that determines whether all moveables can be instantly moved/rotated without the need of a skill or tool.booleanMechanics CheatCheckbox that determines whether the debug options inside the mechanics menu are available.boolean
Climate debuggers

FX panel
This is opened by selecting «Other debuggers», then «WeatherFX Panel». Here you can play around with various values such as fog intensity, precipitation levels and precipitation type. Please note that to play around with these you will need to disable the ‘Climate’ manager or the simulated daily climate will overrule your changes.
Please also note that fog enabled through this method is for testing fog masking around buildings, and won’t look as good/varied as the fog generated by the virtual climate system – as it won’t take into account colour or desaturation.
Climate view panels
The debug climate control and climate values panels can be accessed by selecting «Other debuggers», then «Weather plotter» and «Daily values» respectively. These panels provide a stockmarket-type graph of the current/recent weather over hours (H1), days (D1) and months (M1)
To see what values are running under the bonnet use the legend/panel on the right, and values turned on will be green. The climate values panel, meanwhile, displays additional info about seasons, cloud cover, etc.
These panels are overall for the provision of information, but that said when you toggle «airMass» on, when it crosses the 0 middle line you will see weather generated when airmass switches from hot/cold.
Thunder panel
This panel can be opened by selecting «Other debuggers», then «Thunderbug», but is only useful if there is a storm active. A geographical indication of where the storm is over the PZ map can be seen, as well as lightning locations.
IsoRegions

This will display all buildings (including player-made) and can be used to detect when buildings are fully closed off from the PZ map – and as such will allow fog/precipitation to surround structures, but not appear within them. PLEASE NOTE: this is a real performance hog, so may well slow down the game when turned on.


